
How to Update Netgear Router Firmware

 If you are struggling with Netgear router firmware update failure. Then here is the guide on how to update Netgear router firmware. Updating the firmware on your router improves its performance and helps to protect your network from the latest security threats. Your Netgear router's firmware can be updated using either of the two methods to update the firmware version of your Netgear router. We’ll go through both ways. 

Netgear Router Firmware Update on Nighthawk App -

The Netgear Nighthawk WiFi app is an excellent resource for managing your WiFi network. Furthermore, you can install this app on your Android, iOS, and Windows devices, as well as your computer.

To get the most recent version of Netgear router firmware, first, download the Nighthawk app from here.

Then, proceed as follows:

  1. Connect your smartphone to the Netgear WiFi router.
  2. Start the Nighthawk app.
  3. If the security prompt appears, enter the admin username and password.
  4. The Netgear router dashboard will appear after you sign in.
  5. Now, click or tap the image of your router.
  6. Navigate to the router's settings page.
  7. Scroll to the bottom and click Check For Updates.
  8. If a new firmware update is available, the system will look for it. Select Update.

Do not go online once the firmware update process starts. Also, never turn off the router while updating the firmware.

The router will restart automatically once the update has been fully installed.

Netgear Router Firmware Update on Web Browser -

How to Update Netgear Router Firmware

If you don't have the Nighthawk WiFi app and want to update the firmware on your router, you can do so using a web browser.

Take the following steps.

  1. Connect your computer to the Netgear router using an Ethernet cable.
  2. Now launch a web browser.
  3. Enter routerlogin.net in the address bar. The router login window will appear.
  4. Enter the admin's username and password in the username field. If you don't know these credentials, try using the default admin user name "admin." Enter "admin" or "password" as your password.
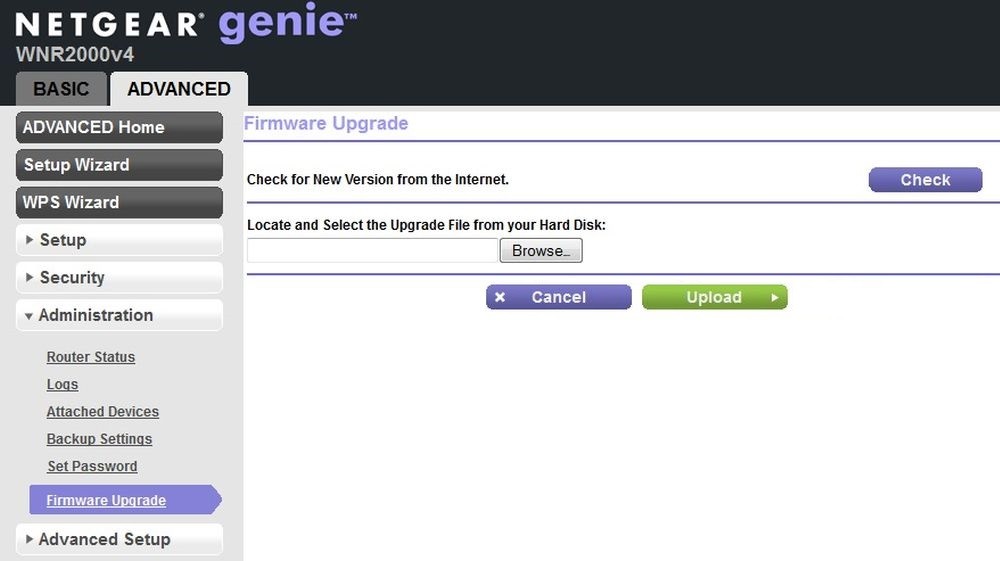
  5. After successfully logging in, navigate to ADVANCED.
  6. Select Settings or Administration.
  7. Go to Administration right away.
  8. Check your router's label after that. There are various router models, depending on the product.
  9. On the Firmware Update button, click. The Router Update button may also show up here.
  10. Tap Check.
  11. Wait while the Netgear router performs a firmware update search.
  12. Click Yes if any firmware upgrades are discovered.

Note- When you click the Yes button to confirm, the firmware upgrade process starts.

Don't attempt any online activities at this time. Additionally, avoid rebooting or turning off the router while the firmware is being installed.

Furthermore, as soon as the update starts, the router will restart. Consequently, you don't need to manually restart it.

Additionally, the entire process will take a little while. Therefore, relegate yourself to the backseat and wait for firmware updates. 

If you have any query regarding Netgear Router Firmware updation then you can visit our website ( wirelessextendersetup.org) and also call or chat with our expert team. They will guide you everywhere. 

Comments

Popular posts from this blog

Understanding Spectrum Router Red Blinking Light - Troubleshooting and Fixes

  Is your Spectrum router blinking red? Well, that’s not a disco light party you should be thrilled about. It actually means your WiFi is having trouble connecting to the internet. But fret not, because I’m here to guide you through the troubleshooting process. Let’s fix the   spectrum router blinking red   issue together. We’ll have your internet up and running in no time! Understanding the Blinking Red Light: Before we jump into the solutions, let’s decode the mystery of that pesky red light. A blinking red light on your Spectrum WiFi router indicates that the router is unable to connect to the internet. This issue commonly occurs after Spectrum service outages, especially with Wave 2 and WiFi 6 router models. Now that we’ve cracked the red light code, let’s move on to the solutions. Follow the steps to fix Spectrum Router Red Light- Step 1: Restart your Spectrum Router The first and easiest step to take when faced with a blinking red light on your Spectrum router is to perform a sim

Detailed Guide On How to Setup Netgear Wifi Extender

  Are you searching for instructions on how to set up Netgear WiFi extender ? You've come to the right post if your response is a resounding yes. Online video watching might be distressing if you have to hold up a tablet or wait for a raw procedure to finish. Additionally, it can take longer, which would irritate the clients. Consider a signal amplifier to resolve this brain teaser problem (extender). Your current WiFi network's range can be simply increased with the aid of this device. In actuality, there won't be any delay in the loading of recordings onto your smart wireless device. The setup for a new extender from Netgear is fairly easy. Without much effort or hard work on your part, it will start working as soon as you connect it into a wall socket. Since Ethernet/USB cables are no longer required everywhere, connecting your home or wireless network has gotten simpler. All you need is an active and dependable internet connection. How to Install a WiFi Extender from

How to set up TP-Link WiFi extender?

  We'll walk you through how to set up a TP-Link WiFi Extender step-by-step. To install the extender, follow the steps below: Connect With A Router There are two ways to set up the extender. The manual method (using an Ethernet cable) is the first, and the WPS method is the second. One of them is mentioned further down this page. You can choose either of them at your leisure. (With Ethernet Cable). TP-Link WiFi Extender Setup Manual The TP-Link extender must first be connected to your computer via an Ethernet cable. Then, to set up your TP-Link WiFi Extender with an Ethernet cable, follow the steps outlined below. 1. Make sure your TP-Link WiFi extender is turned on. 2. Connect it to your computer using an Ethernet cable. 3. Open any web browser and type "192.168.0.254" into the URL box. A TP-Link webpage will now appear on your screen. 4. Select Quick Setup and then proceed to the next step. 5. Select your region before going on to the next step. 6. Your TP-Link extend